Doing Laundry Never Felt So Luxurious

Standard

Way back in 2014 when we bought the Casa Fickbonne, we were on a tight budget for things other than the purchase of the actual house. The house didn’t come with a washer and dryer (nor plumbing for same). I ended up paying $50 for a used dryer from a friend of a friend, and getting a used washer for free from a coworker. Very frugal and sensible.

Over the years the two machines slowly broke down. The dryer made things less dry, and the washer broke twice. Mr. Fickbonne got pretty good at fixing it, though, and so we soldiered on.

Yet I dreamed of a laundry room that made doing my damn laundry feel less like a chore and more like… something not annoying? I wanted better machines, a dedicated sink for soaking and hand-washing, a better drying rack, clear storage space for all the laundry accoutrements, and decent lighting. I didn’t want to feel like Cinderella slaving over the laundry anymore.

With the Great Basement Finishing of 2023 I got my dream laundry room! And four months later the washer finally broke down for good.

Fortunately, Costco was having a sale. We ended up getting an Energy Star rated LG washer and dryer for about $1,400 including delivery and installation. The delivery guys were fantastic… if by “fantastic” I mean they cracked jokes and teased me the whole time and they helped me take the back door off the hinges so they could get the machines downstairs.

These machines are great. They’re more environmentally friendly and energy efficient, fulfilling our filthy tree-hugger goals to lessen our impact on the environment. Plus they just… clean our clothes way better than two decades-old used machines? And aside from the whole singing thing (they sing when they start, they sing when they stop, it’s certainly preferable to a loud annoying buzz), they’re quiet.

Alert readers will also notice in the photo above that I got my laundry sink! Fernando installed it when he was doing the plumbing for the rest of the basement. It’s great. Not only can I use it to soak and hand-wash laundry, but I’ve been using it for rinsing paintbrushes, dissolving packing peanuts, and all the other random things I don’t feel like doing in my kitchen sink.

And see that well-organized shelf up there? I installed that myself shortly after the contractors were done. Pro-tip: plastic drywall anchors are bullshit. Don’t even try to use the ones that come with shelf brackets. Just go to the hardware store and get a big pack of metal anchors. It’ll save you a lot of frustration.

Last but not least, I found the coolest retractable indoor laundry line. In the back yard we of course have a retired climbing rope for a laundry line. But I wanted something inside for the winter that would be fairly compact and unobtrusive. Look at this thing:

It’s incredibly sturdy, and the line itself is a flat vinyl strip kind of like a tape measure. It has holes all along it for hangers! Now I can get rid of my centuries-old wooden drying rack (pictured above under the line) and save a little space. Just had to make sure I installed both ends of the thing in studs.

At last, the laundry room of my dreams! 14-year-old me is shaking her head sadly and asking “Why are we no longer cool?”

Why Did We Wait So Long to Make These Fixes?

Standard

Having our house full of professional thing-fixers (some might call them “contractors”) during the Great Basement Finishing of 2023 meant that suddenly, we felt compelled to point out little things that needed fixing. And they graciously complied.

Outdoor outlet under the portico

When we moved in we had two outdoor outlets: one on the back of the house, and one under the portico by the Symbolic Table of Generational Bonding. The first worked. The second did not. Which meant our options for plugging stuff in outside were limited.

Rob, our basement electrician, replaced the broken outlet with one that works. Problem solved!

The backwards shower handle

Anyone who has showered in our upstairs shower (as opposed to our downstairs shower… which feels so good to say) noticed that the faucet handle was backwards. This meant you turned the wrong way for hot or cold.

We mentioned this offhandedly to Fernando and he just… fixed it. Without even mentioning it! He was messing around in the plumbing for what would become the downstairs bathroom (again, I love that phrase) and he took a couple extra minutes to swap the thing around. We were so surprised we thought it was broken at first. But now our shower is intuitive and wonderful.

The wrong size heating vents

The heating vents in our living room floor were literally just holes to the basement. Obviously we wanted them to be proper ducts, closed up before the basement ceiling went in. We thought that would be the end of it!

But Oscar and his carpenters went above and beyond. See, the vent covers were the wrong color, and the holes they sat in were too small, so the vents didn’t seat properly. Oscar cut the holes in the living room floor to the proper size and spray-painted the interior of the holes black along with the vent cover. The result looks so much more professional and generally not like an eye sore.

He didn’t have to do this! He could’ve just closed up the ducting and called it a day! Yet he wanted our living room to look as nice as the basement. What a gent.

Second outdoor faucet

As a gardener, my outdoor faucet situation was mildly embarrassing. I only had one, you see. I’d placed a splitter on it so I could have an irrigation line go directly to the corn patch in the front yard. But that left me with only one hose for watering the whole backyard garden. And things got awkward when wrestling said hose around trees and furniture.

Once again Fernando came through by building me a second outdoor faucet on the other side of the house. This one is perfectly placed for watering the trees, washing the boat and cars, and bathing the dog. Again: a second faucet is something I just mentioned I’d like—and Fernando made it happen!

The funny thing about all these minor little repairs and improvements is… we’d lived for years just making do without even considering fixing them. They were mostly beyond our ability to fix (my experiments with plumbing, as you know, have been… less than successful). So we just put up with them and chalked it up to old house quirks.

Yet now that they’re all done, I feel like an idiot for waiting so long. Our lives are so much better with two outdoor outlets and two outdoor faucets! The living room looks so much better with proper heating vents! My showers make sense!

So let this be a lesson to you all: fix the minor crap that annoys you daily. It’s worth it. Life will be better.

This House Is Fully Solar Powered

Standard

It’s no secret that Mr. Fickbonne and I are a couple of filthy tree-huggers. Some of the biggest home renovation decisions we’ve ever made have been done for the purpose of lessening our impact on the environment: insulating the attic, installing a whole house fan for cooling instead of air conditioning, the rain barrels, planting a garden of native plants, and replacing outdated major appliances with Energy Star-rated models.

But now we’ve made our biggest environmentalist decision yet: we got solar panels.

It’s something we’ve always wanted to do with our house. We live in Denver, where the sun shines 90% of the time with blinding intensity, and we have a south-facing roof with not a single tree or building blocking it from direct sunlight. Plus, our energy consumption is relatively low compared to our neighbors (the energy company sends around a notice comparing you to your neighbors for some reason, so we know we’re the lowest energy consumers on the block). So we knew we’d be good candidates for solar power.

After shopping around for a bit, we went with Tephra Solar. We liked them because they’re well-established and easy to work with. We asked a lot of questions, and they were super helpful at every step of the way. Highly recommended! Tell them we sent you!

First, let’s talk about the money. Basically… it doesn’t feel like we paid for the solar panels at all. Our monthly electric bill worked out to around $90-$100 every month. With Tephra, we agreed to zero down, zero interest monthly payment plan of about $90-$100 every month. So essentially, we swapped one electric bill for another. But instead of paying money to a giant monopolistic energy corporation, we’re paying it to a renewable energy company so that we can own the source of our household electricity. I am practically floating off the ground with the amount of smug, frugal earth-friendliness I feel.

The installation itself took about 4-5 hours.

They installed the solar array on the south-facing side of the roof (duh) and a control box on the back of the house where our fuse box and energy meter are located. I was surprised at how nice and organized everything looked. I guess I kind of expected it all to look… jerry-rigged and unnatural on our century-old craftsman bungalow. But the array is actually fairly small and kind of pretty, in my humble opinion. Take a look:

We got the panels installed the same day we had the new garage door installed and our new washer and dryer delivered. It was a lot for one day, but I’m glad it was all over and done with at once. I sent the dog to my in-laws’ house for the day and got very little work done, but it was worth it.

We then had to wait for the inspector to come check everything out. This took a few weeks for some reason, which was annoying. But once it was done, it was all a little anticlimactic! We got a message from the solar company telling us to turn it on. Mr. Fickbonne did this while I wasn’t looking, and I literally didn’t notice the switch. The lights didn’t even flicker. Just a smooth transition from on-the-grid to fully solar powered!

In the time we’ve been off the grid, the weather has been snowy and cloudy. AND YET… we haven’t had a single interruption in electrical power. Come summer, we expect to be able to contribute energy back to the city, lessening our environmental impact to an even greater degree. You guys… the smugnessssss.

We Finally Finished the Basement

Standard

Here it is, folks: the update you’ve all been waiting for! For I’m going to finally—finally—reveal the results of our biggest house project yet: The Great Basement Finishing of 2023.

Dedicated readers will know that when we moved into the Casa Fickbonne nine years ago (has it really been that long???) we took one look at the basement and said “This will not do.” And then we started saving and planning. The basement had been completely finished at some point in the past, as we learned from the granddaughter of the man who built it. But the guy we bought it from had been running a business of questionable legality down there, and decided it was a good idea to rip out all the walls, throw up some substandard framing, and then give up and sell the joint (pun intended). It was… well, it was an unfinished basement in a century-old house.

When our pal lost his housing in 2019, we threw up some black curtains as walls and made it as homey as a concrete dungeon could possibly be. He lived down there off and on for about a year before moving in with his girlfriend, and after that we used his old “bedroom” as a guest room for our cousins and adventurous friends when they came to visit.

But still… we longed for a finished basement. We wanted an actual guest suite. A second bathroom! A laundry room that didn’t make us feel like scullery maids! A gear room with enough shelving and space to keep our sports and hunting gear organized. And insulated ceilings so you couldn’t have a conversation between floors without raising your voice.

In the summer of 2023 we made it happen.

But we knew we couldn’t do it alone. So we hired our dear friend Vahe as the general contractor (alert readers will remember him from when we painted the exterior of the house) and I set to work designing our dream basement. Vahe’s plumber, Fernando, was instrumental in looking at my plans and going “If you put the bathroom here instead it’ll save you about $15,000.” So shoutout to Fernando, Master of Plumbers, Patientest of Contractors, long may he reign. Here’s the design:

Triangles are doors, yellow rectangles are windows, white shapes are appliances, purple rectangles are closet and fireplace.

In any major home remodeling project, you are guided by a three-way Venn diagram: cheap, fast, and quality. You can only choose two. So we chose cheap and quality and sacrificed speed. This meant the basement was under construction from roughly April through September of 2023 at one level or another. But we came in under budget at $65,000, so I call that a win.

Because we were starting with a not-quite-blank-canvas, we were able to reuse the 2x4s from the substandard framing, the outlets and switches from the business-of-questionable-legality, and a few other materials. Huge shoutout to our master carpenter, Oscar, who was a genius with these decisions. Oscar spoke very little English, and he was extremely patient and kind with my halting Spanish. (Side note: I was feeling great about practicing Spanish with him before our trip to Spain in May… until we got there and the dialect, accent, and talking speed made me feel like, well… like I’d been practicing in a completely different dialect and accent.)

Unfortunately, what we saved by reusing materials we lost when our contractors realized that the gas line (100 years old) and some of the plumbing were not up to modern building codes. Much unsexy work was done to modernize stuff that goes inside walls and makes the house not explode or flood.

Wherever possible, we deferred to the construction experts (Vahe, Fernando, Oscar, and their crews). I was determined to be Not a Difficult Client. But we also deferred to the stylistic experts! For I don’t trust my aesthetic taste. So much credit must be given to my sister-in-law Amy, cousin Jackie, and friends Meg and Lauren for helping me pick out paint colors, carpeting, flooring, bathroom tiles, and light fixtures. Because of them, our basement is as stylish as it is sturdy!

And now, let’s look at the finished product:

With this massive project, we almost doubled the square footage of our home. The second bathroom alone was worth the months of hammering and sawing and general chaos. The first time I used a bathroom at the same time as Mr. Fickbonne, I was like “I wonder what the poor people are doing right now?”

I feel so much happier in our house! I’ll write some follow up posts about the various small DIY projects I’ve done since the contractors finished up. You’ve already seen the linen closet shelves, but wait ’til you get a load of my LABELED GEAR STORAGE!

… And a New Garage Door!

Standard

When Mr. Fickbonne and I moved into our first rental house together (no roommates… until Catey moved in six months later), the garage was basically a crumbling brick structure with an ancient door it took two people to open. It was less a garage door and more a pain in the ass.

Then we moved to our next rental house and the garage door was equally dilapidated and structurally unsound.

Then we bought our first house (the titular Casa Fickbonne) nearly ten years ago. And (try to contain your shock) the garage door was pathetic. The whole garage, really, but mostly the garage door. It regularly broke down, falling partially off its track, or having its suspension wires snap. It was a beast to open and generally caused stress and irritation. ‘Twas bad, y’all.

Wow, the backyard and garage have… really changed.

It got to be a running joke. Mr. Fickbonne, our friend Craig, and I spent one Christmas Eve rewriting Robert Earl Keen’s seminal masterpiece Merry Christmas from the Family to include the line “we need some prosciutto and a new garage door!” We’re hilarious.

I’ve repaired the Casa Fickbonne garage door literally three times over the years with small part replacements and jerry-rigged fixes. But recently Mr. Fickbonne tried opening it, it got stuck, and instead of leaving it alone (not that I’m blaming him at all, for I am an understanding wife and would never do that) he went HULK SMASH. He yanked it up so hard that a panel of the door ripped off and the whole thing kind of just… disintegrated like an old shack in a comical cloud of dust.

A new garage door was called for.

We hired Johnson Garage Door Services of Arvada to install an actual, functioning door. They were lovely to work with–and they admired the chickens! They showed up on time, were very pleasant to chat with, and were in and out within a few hours.

Plus one of the guys was new and getting trained in the business, so in the course of listening to him get trained, I learned a lot about garage doors (my hobbies are many and various).

The door itself is a dream come true (tell me you’re a middle-aged homeowner without telling me you’re a middle-aged homeowner). It glides effortlessly up and down on its tracks, and you can even stop it midway without it crashing down with the risk of bisecting your body!

It locks easily too, which was something we fought with on the old door. And it’s got rubber sealing on the bottom to keep rainwater from spilling in—something I didn’t realize I wanted until I had it! And rather than being rotting wood, it’s metal. So fancy!

Anyway, the new garage door has vastly improved my life. For a little over $1,100 all in, it was well worth it to keep my wood shop and Ben’s hunting gear dry and secure.

That’s the new guy at Johnson Garage Door Services. Thumbs up to a job well done!

The Most Expensive Shelves to Ever Float

Standard

Look, I know you all have been waiting with bated breath* for the big finished basement reveal. And today… is not that day! But because I care about you, my teeny tiny audience, I shall give you a little preview of one of the DIY projects that I personally created in the newly finished basement.

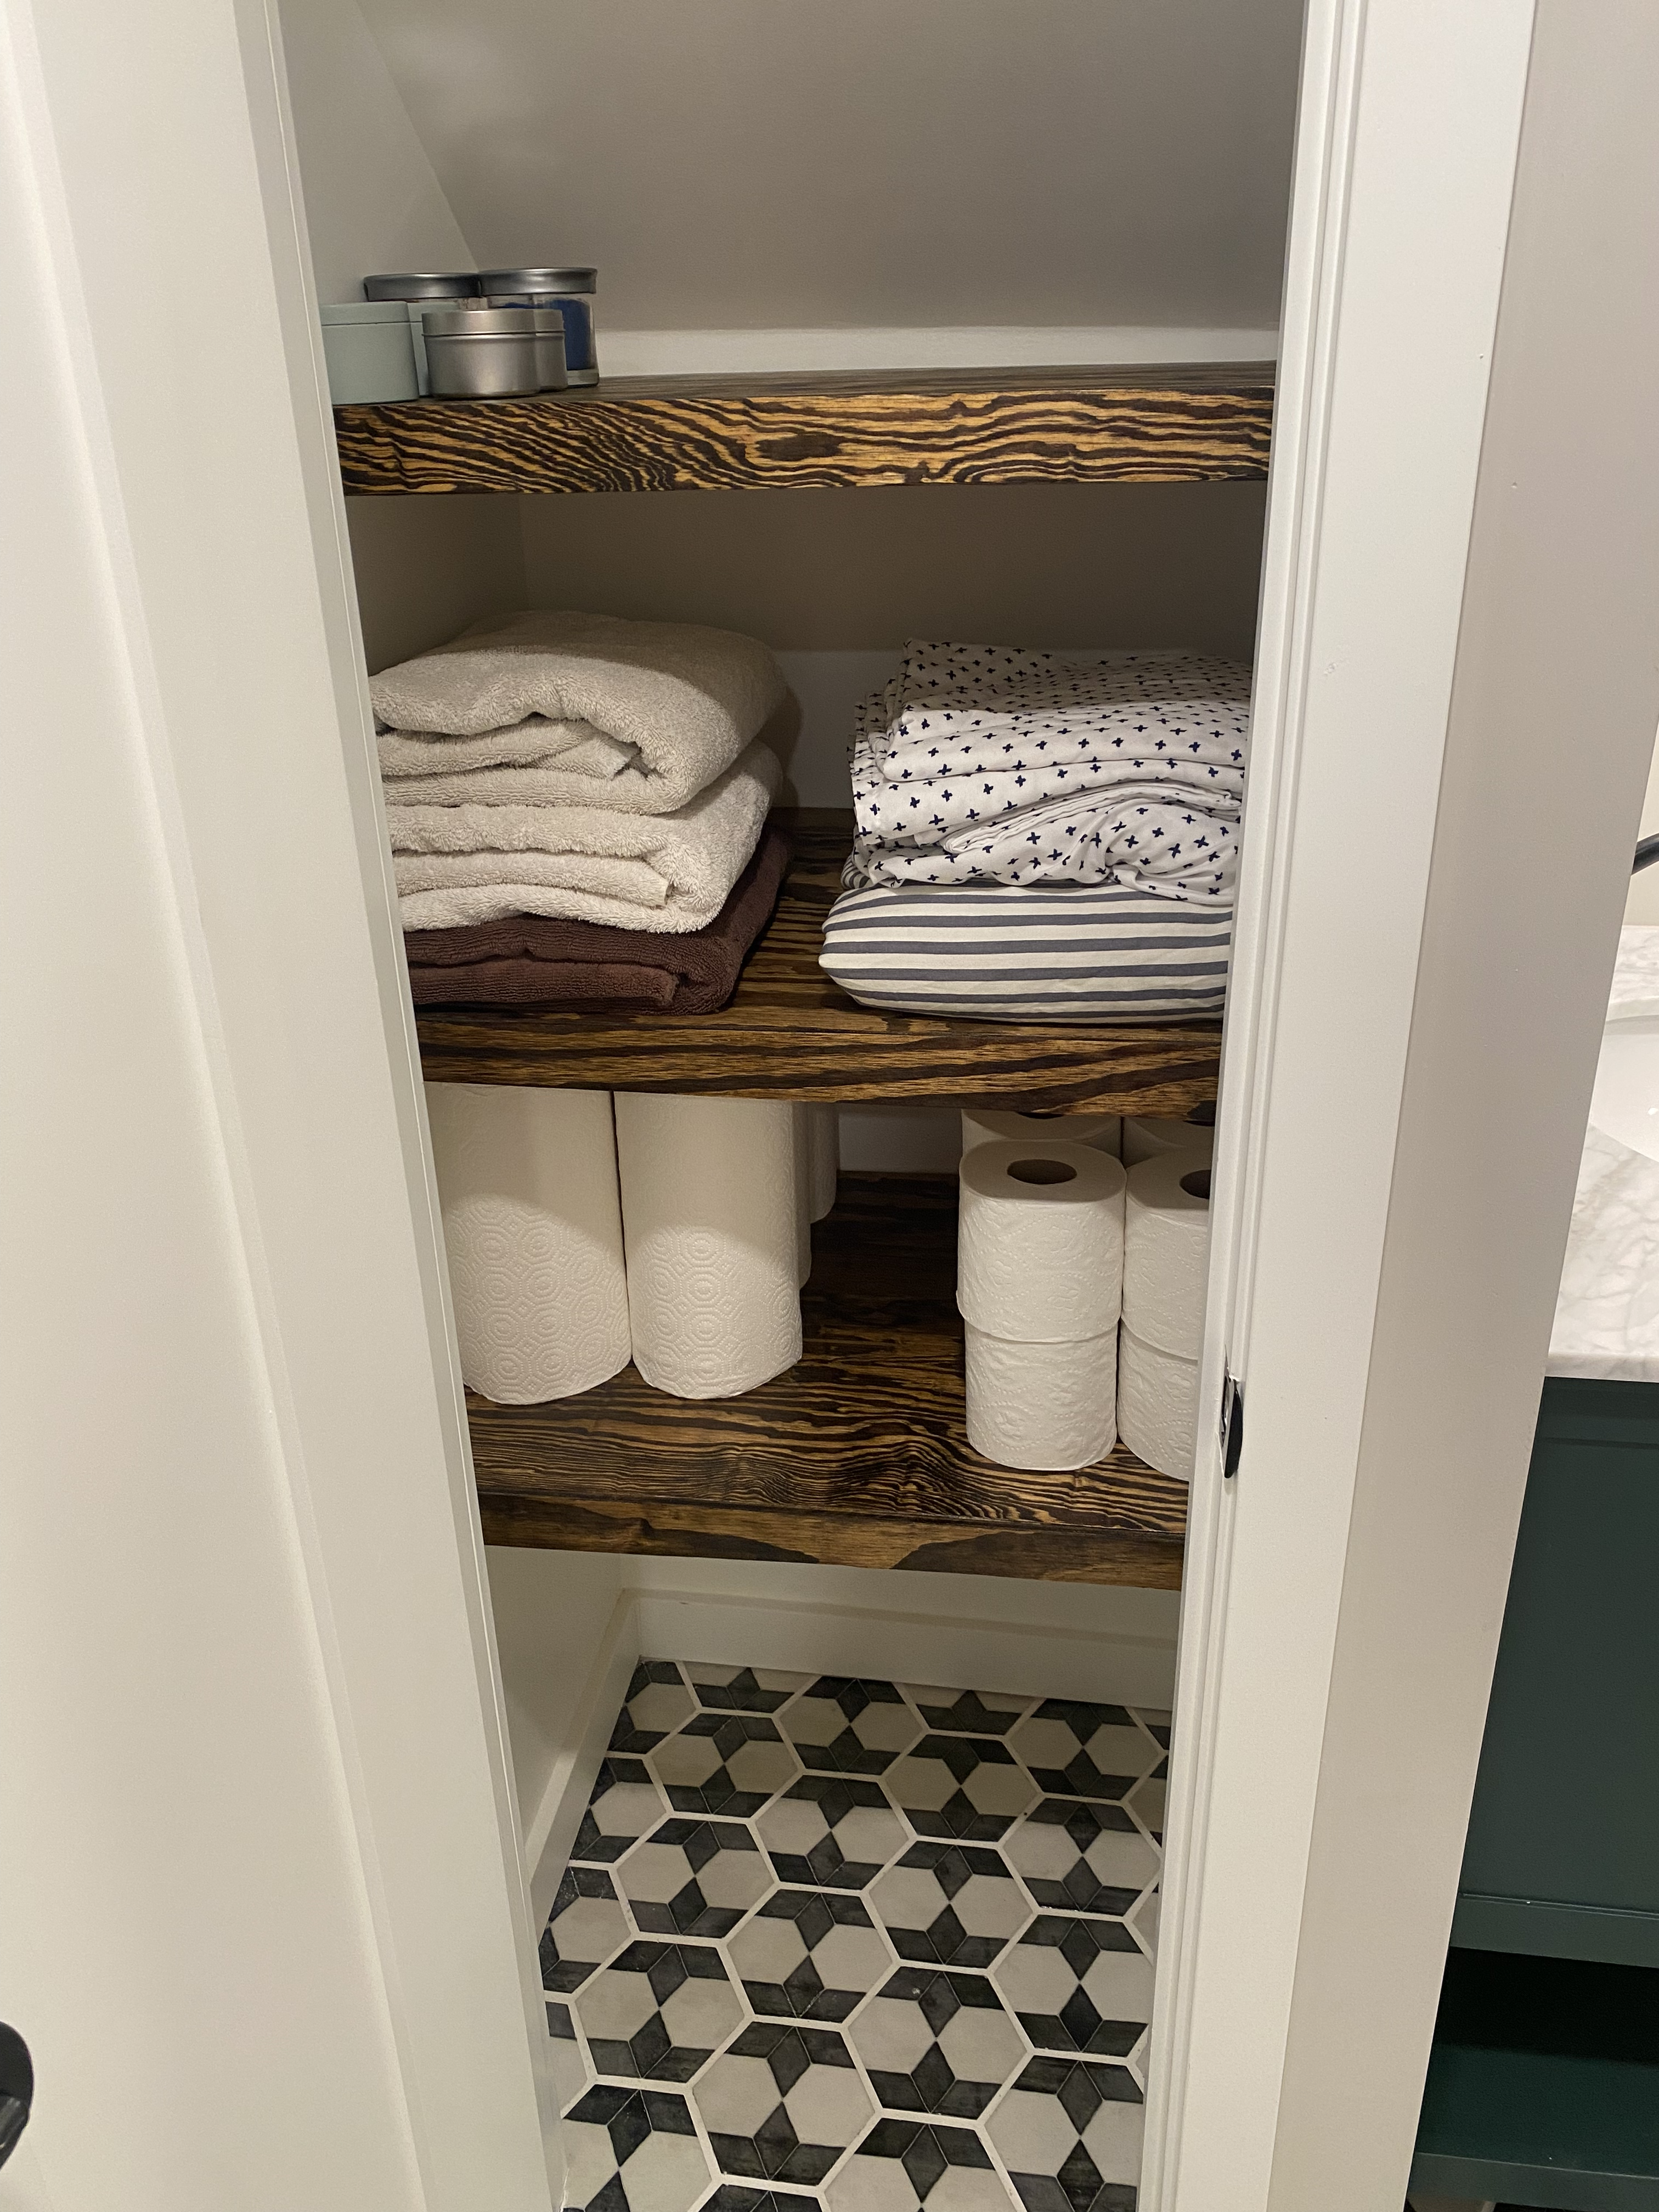
Behold my linen closet floating shelves!

I wanted to have a few projects to do myself, so I had our amazing carpenter Oscar build the bathroom linen closet without shelves. Sure, he could have built them in a third of the time and with a much higher level of skill. But I wanted to do it! And it’s my house, dammit!

What I didn’t realize is that Oscar probably could’ve done it for a tenth of the cost, too. Because right now lumber is more precious than gold. And while normally I can build small woodworking projects with just the scrap wood in the Garage of Wonders, this time I needed something a little more specific. So the flat part of three floating shelves is about $60 (not a typo) worth of project board from Lowe’s. Ouch! My miserly heart!

Let’s not dwell on it. Everything else—the screws, wood glue, stain, sealer, mounting boards, level, drill, and screwdriver—I had on hand.

First thing I did was cut, sand, stain, and seal the wood. Haven’t broken out the circular hand saw in a minute, so that was a real treat! (She said, middle-agedly.)

Second thing I did was find out the standard distance between closet shelves, then attach some 1×1 scrap wood to three sides of the closet with judicious use of the level. My floating shelves would sit upon the mounting wood, with a piece of facing board attached to the front of each shelf so you can’t see the mounting wood where it connects with the wall. Comme ça:

The most finicky part was getting the facing boards attached to the front of each shelf. I had to attach a little scrap wood in the middle of the shelf to keep everything level and aligned, and then go ham with the wood glue and clamps. I ended up screwing the facing boards in to the corners as well, which is when I decided I a small nail gun is just the tool I’ve been missing for house projects.

Ta-da! Now whenever I change the sheets on the guest bed I’ll think of what a good and talented carpenter I am.

Stay tuned for the big finished basement reveal whenever I get around to it!

*Bated breath: Coined by our pal Bill Shakespeare in what I consider to be his cringiest work, The Merchant of Venice. “Bated” is of course not an actual word, but is how old Bill chose to fit “abated” into iambic pentameter (gotta admire his commitment to the bit). Anyway, “with bated breath” just means you’re holding your breath in anticipation. This has been Fun Facts with a Literature Major.

Who Needs Retaining Walls When You Have Rabbit Brush?

Standard

From the very first day, the front yard of La Casa Fickbonne has been less a yard and more a lesson in erosion. The only flat patch is to the side of the garden gate, which we naturally turned into a garden bed for the corn. (Some see “flat patch of yard,” I see “just enough room to fit another garden bed.”) Other than that it is a steep slope of dirt and weeds steadily sliding onto the sidewalk with every rainstorm.

A lot has changed since we took this photo 8 years ago…

Or at least it was.

Planting grass on the slope was out of the question. We live in a desert and we get charged for water. Grass is notoriously greedy for water. So we thought a retaining wall was the best way to go. After getting our first estimates of $4,000+… we decided to table the idea.

Then we fell head over heels in love with our landscape designer, Eryn Murphy. Her expertise is in using native plants and intuitive design to build landscaping that is sustainable, drought-resistant, and friendly to local fauna and pollinators. We started working with her two years ago on our backyard, and last summer we had her help us with the dreaded front yard slope.

The thing with landscaping is that you kind of have to let it mature to get results. Which is why the last two years I haven’t really shared any landscaping pictures here on the ole’ house blog. But I was cleaning up some fallen leaves and trimming our native grasses the other day and saw that all the lovely native plants Eryn helped us plant last year are popping up from their winter slumber! So I decided today’s the day to explain how we handled the dreaded front yard slope.

First things first, Eryn crafted a design for us that would incorporate water sources (i.e., gutters that drain onto the slope), blooming schedules (so everything doesn’t bloom all at once and then chill so our slope has a little color all summer long), and shade (the slope faces East).

We prepped the slope by ripping out as many of the weeds as possible and scattering some fresh homemade compost (of which we have gallons because I am obsessed with composting). We wanted a little bit of retention at the bottom of the slope to protect from erosion while the plants grew their roots, and also to give us a straight edge in the winter for shoveling against. So we used some old fence posts from our last fence repair to mark the edge of the sidewalk.

Then on The Hottest Day of the Year (or so it felt), we started digging holes and planting plantlings. Eryn had supplied us with tons of young asters, penstemon, rabbit brush, flax, grama, sideoats, sundrops, sage, winecups, pussytoes, and more. We tried to stick to her design, but toward the end we got slightly lazy and hot and just called some audibles on plant placement.

I laid down some insulating mulch to help with water retention and overall prettiness. Then we strategically placed a bunch of landscaping boulders I got for free on Craigslist. Note: people give away very heavy things for free all the time. You just have to be able to move them yourself. Thanks random Craigslist guy who let me drive into his backyard to collect all these boulders!

Aaaaaand then it snowed. Because Colorado. We lost maybe 30% of the young plants despite our efforts to cover the slope and insulate them. After that devastating blow, though, the plants took off! Here’s how one side of the slope looked at the end of summer when the plants had reached full maturity:

Pretty, right? And this year they’ll likely be even bigger now that they’ve had a whole year in the ground to grow their root systems and propagate. I specifically didn’t put down any landscaping fabric below the mulch because I need them to spread as much as possible. The bigger the plants’ root systems, the more erosion-proof the dreaded front yard slope.

To finish it all off, I placed some sandstone pavers at the top of the slope to lead from the front steps to my car. Since I regularly cut across that space anyway, I figured I’d make the path official.

Writing this post was my way of getting excited about gardening season. We’re SO CLOSE, but as it literally just snowed this morning (because Colorado), I’m going to have to resist for a few more weeks. I’ll post an update of all our native plants later this year when they’re all in bloom and surrounded by the buzzing of our honeybees and native pollinators. For now, I shall leave you with last year’s mini poppies… which were poppin’.

How Long Does It Take to Build a Pantry Door?

Standard

When we bought La Casa Fickbonne, it had kind of a crappy pantry. The door was clearly not original, and looked like it had already been shoddily repaired with some wood glue. Plus, there were no actual shelves in it—more of a narrow broom closet than a pantry. So we built some rudimentary shelves and went on with our lives.

A few years later, the dog broke into the pantry by simply nudging the part of the pantry door that had been glued in place. So we reglued it and added some nails for good measure. That fix lasted maaaaaaybe another year.

Finally, the pantry door was broken beyond repair. Filled with hubris, I crafted a brand new pantry door, complete with decorative trim. Before finishing it, I decided to fit it into the doorway.

Which is when I discovered I’d measured wrong and the door was almost a half inch too narrow for the doorjamb. Filled with frustration, I stuck a hook and eye closure on the damn thing and called it good… for the next four years.

The pantry door has been an eyesore and a source of frustration for all that time. If someone forgot to hook it closed, the dog easily broke in and ate tortillas by the dozen. Yet I hadn’t found the time to actually craft a working door that would fit the odd space and close on its own.

WE NEED A HERO DAD.

My dad taught me nearly everything I know about carpentry. Which is why when faced with a carpentry dilemma, I go to him for help. Do I feel guilty about putting him to work on a home improvement project every time he visits? Why no, I do not. Why do you ask? Are you suggesting my father would prefer to relax and see the sights when he’s in town instead of slaving away in my subpar wood shop with my subpar tools on whatever new project I demand of him? Shirley, you jest.

Dad was in town for a visit recently, and he helped me make a new pantry door, one that fit the space, that closed and locked on its own, and that actually looks pretty.

We got a piece of pine project panel large enough that when we cut it down to size, we could repurpose the discarded pieces as trim on the door to make it match the little cabinet above the pantry in the kitchen.

We repurposed the original hinges since they were already set into the frame. This meant chiseling out spaces for the hinges in the door itself.

Because the doorway is original to the house and not a standard size, the door would not swing closed all the way. So I got to learn a new woodworking technique! It’s known as making a chamfer. This is basically when you cut off a corner of a board at a 45 degree angle. In our case, it gave the door enough room to swing shut around the odd corners of the door frame. And all it took was a little careful cutting with the table saw. (Lots of table saw work in general here. On a related note, my table saw sucks.)

For the finishing touches, we glued and clamped the trim in place.

Then we added a sliding latch that looks nice and farmhousey, to match our overall aesthetic. When latched shut, it would take a whole team of dog scientists armed with opposable thumbs to open.

The pantry was officially pooch-proofed! And dad was allowed to rest while I cleaned up the tools and stained the door with Minwax Jacobean. My next step will be to sand and re-stain the cabinet door above the pantry and (eventually) to rebuild the shelves in the pantry to be a little nicer.

A job five years in the making. Now I can finally move on with my life without worrying about the dog breaking into the pantry every time we leave the house.

I Did So Much Math for These Hanging Shelves

Standard

I had two problems:

  1. My home office needed some storage space that wasn’t an eye sore. Most of my professional library was stacked on a random cabinet I’d refinished just for fun that didn’t really fit in the room.
  2. Mr. Fickbonne was complaining about there being too much furniture in the house and it feeling cramped. (A valid complaint when you’re a giant.)

So to solve both problems, I decided what I needed were some floating shelves in the office/guest room. And I wasn’t just going to buy said shelves like some kind of furniture-buying peasant. Nay—I would engage my gentlewoman carpenter skills to design, build, and install shelves the likes of which the world had never seen!

I had an idea for something that would fit in the corner and look incredibly cool. And you guy… I actually drafted my plans. With a ruler. There was geometry involved! Then it was off to Lowe’s.

Because my floating shelves would sort of straddle the corner, I used my miter saw to cut my pine boards at 45 degree angles. And for the same reason, I got to use my trusty Kreg jig to attach the boards at the corner angle. I first learned how to use the Kreg jig when Dad and I were building the Symbolic Table of Generational Bonding and since then I’ve gotten much better at it (hint: all the clamps). The closeup below is of my test shelf. The final shelves all had a layer of wood glue and three screws attaching them at the corner joints.

Once I had all my shelves finished, it was time to assemble them. This involved more mental geometry because—while my plans were very comprehensive—the nature of the design was a little tricky to visualize in the flesh. I only made one easily fixed mistake, however, and for that I would tell my high school geometry teacher to suck it… except that Mrs. Plummer is very cool and I’ve always liked her.

After I’d assembled the shelves, I got out my beautiful new orbital sander and went to work sanding everything down. Then I got out some Minwax semi-transparent water-based stain in Slate, a color I’ve never used before but absolutely love. I was worried it would look too blue at first, but once everything had dried it looked exactly the light shade of gray I was going for.

Next, I sealed it with a wood wax. Why wax? Why not! I’ve never used it before and I wanted to try something a little different. The application is a little funky: you have to stick a golfball-sized pat of it between two layers of cheesecloth and then rub it into the wood. Then you have to wipe everything down with a clean cloth, basically buffing it to a nice shine. I actually liked the results better than paint-on polyurethane or other paint-on sealants because it filled the cracks nicely without going all gloppy. Polishing with the cloth was a little hard, though. More practice is necessary!

Anyway then I let the silly thing dry.

Mounting it was the thing I was most nervous about. It’s big and heavy and made of wood. And while I designed it to float elegantly in the corner, I knew I needed a truly sturdy hanging solution that could handle both the weight of the shelves and the added weight of books. What’s that apocryphal story about the architect who designed a library and it collapsed because he forgot to account for the weight of the books? Yeah that. Heard it on How I Met Your Mother.

Anyway I got a bunch of angle brackets and replaced their little nubby screws with molly bolts. A note on molly bolts: hardware stores stock them under “drywall anchors.” Which is misleading if you’re me and the whole reason you want molly bolts is because you have 100-year-old plaster and lathe walls. Anyway I went with these bad boys from Toggler. They’re rated at 159 pounds, which is hopefully heavier than my professional library. The trick is to pre-drill a hole in the wall, hammer in the anchor, and then screw in the screw.

NOTE: ALL OF THE ABOVE PARAGRAPH IS DAD-RECOMMENDED AND DAD-APPROVED. I EVEN FACETIMED HIM FROM LOWE’S.

And voilà! The floating shelves in their natural habitat:

After I cleaned up the construction dust and moved the little cabinet it would be replacing, I got to the fun part: arranging my professional library on my new shelves.

I say “professional library,” but really it’s more of a career hall of fame. Here are the highlights:

  • Some of the reference books I use for work like the Chicago Manual of Style and the Associated Press Stylebook.
  • The Motley Fool Investing Guide and Understanding Financial Statements: A Journalist’s Guide… for obvious reasons.
  • Some old industry faves like Eats, Shoots and Leaves and Strunk and White’s eponymous The Elements of Style.
  • A handful of FalconGuides I acquired in my time at the publisher.
  • Woman in the Wild by Susan Joy Paul, which was the last major acquisition I made for Rowman & Littlefield, for which I fought tooth and nail and of which I am insanely proud.
  • My agent copies of Financial Feminist by Tori Dunlap, the first book I represented as a literary agent!
  • Helen Ring Robinson: Colorado Senator and Suffragist, by Pat Pascoe, which was my very first acquisition as a baby editor at the University Press of Colorado.
  • Oh the Places You’ll Go! by Dr. Seuss. This particular copy was given to me by my colleagues at UPC as my going-away present on my last day there. An incredibly fitting gift signed by the whole staff.
  • The Divided Dominion by Ethan A. Schmidt. I acquired this one while working at UPC and Ethan quickly became one of my favorite authors to work with. We met up for lunch once and he brought his awesome wife and three adorable kids. Tragically, he was murdered in a campus shooting a few months after the book was published. I treasure the book in his memory.

This was an incredibly fun project. I’m so glad I tried new techniques and designed it all myself. Now the office is less cluttered and I have something pretty to look at while working!

The Perfect Yellow for Southwest Decor

Standard

We painted an accent wall! Yes another one! But this was the most exciting one yet because it serves as a place to mount my 2021 Christmas present from Mr. Fickbonne. Ta-da!

I’m leading with the “after” picture because I think the finished product is just about the prettiest thing I’ve ever seen. Obviously, the yellow bit is the new accent wall and the bison skull was my Christmas present. It’s been sitting in the basement for 9 months while I kept forgetting to pick up masonry screws from the hardware store.

Because naturally, the bit above the fireplace is plaster over brick. We had to use a masonry drill bit to drill pilot holes into the brick, then use heavy duty masonry screws to attach the bison skull’s mounting hardware to the wall. It was easy with the right tools… and impossible without. But once we had ‘er up there, we uh… realized the skull was the exact same color as our walls:

Cue aaaaaalllll the paint swatches! Which I never do, but I was really glad I did in this case because I had house guests and of course my Aesthetics Vibe Check Group Text to weigh in. Many hands make light work! Especially if one pressgangs one’s father-in-law into painting straight edges.

Skulls are expensive. Even if you do the hunting yourself, you’re looking at a fortune in hunting permits, equipment, and processing. Which is why Ben wrote to a friend of a friend of a friend who happens to own a bison farm. He asked him to process and ship him the skull. It was far cheaper than buying from a normal… dealer of animal skulls. And I love it.

Keen-eyed readers will notice a few Easter eggs in the photos:

  • Jon the chief painting peon, long may he reign, who also helped with some bricklaying back in the day.
  • Those gorgeous dahlias were grown by our dear friend Meg.
  • The fancy wooden candle holder in the fireplace was lovingly crafted by my dad, chief architect of the Symbolic Table of Generational Bonding.
  • The paper flowers are from our wedding, and yes the wall matches them.
  • Speaking of weddings, the dried flowers in the suspiciously symmetrical hole in the bison skull (I wonder how she died???) were Mr. Fickbonne’s boutonniere at the wedding of our friends Will and Becky.
  • I’ve now painted every inch of this single wall of the house and I never will again.