Making the Basement Habitable

Standard

Our 40-year-old son other dog friend Chad just moved in with us! We’re pretty psyched, considering Chad had moved to Michigan for a while and only recently came back to Denver for a new job. Needless to say, we missed him, and having him under our roof means we can keep an eye on him.

We wanted Chad to have his own space, which meant having him live long-term in the guest room/my home office wasn’t a very good solution. For one thing, it has two doors and no closet and feels more like a hallway since you have to pass through it to get between the front and back of the house. For another thing… I work from home full time and I kinda need access to my desk. And for a third, we have house guests fairly often, and it’s nice to still have a guest room available to them.

So that left the unfinished basement as Chad’s domain. Specifically, the area marked off by the wall framing closest to the front of the house. It has a fireplace (non-operational right now) and an egress window, so it could be a legal bedroom. Buuuuut as previously mentioned, the basement’s not finished, soooooo…

I started by clearing the dog crate and exercise equipment out of Chad’s new “room.” Then I worked top to bottom clearing out the cobwebs and tumbleweeds of dog fur and dead bugs. You never really consider how much of that stuff accumulates in an unfinished basement over five years until you need it to be fit for human habitation.

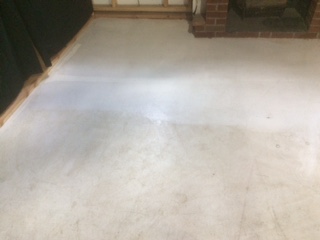
But the real challenge was the floor. In short, it was disgusting. It’s cement painted white, so every bit of mud, canine urinary accident, spill, and dead bug guts stood out in painful detail. I literally got down on my hands and knees and scrubbed the whole thing with soap and water. You can literally see the line between dirty and clean here:

IMG_5537.JPG

Next I needed to put up a wall. I didn’t have time to actually hang drywall, so instead I stapled some black sheets to the framing to create a little privacy. It’ll have to do for now!

It’s not all bad, though. The basement also contains the world’s most giant TV, given us by a friend in exchange for storing some of his stuff while he moved. I built out the fireplace mantelpiece with some sturdy scrap wood and placed the giant TV on it. Voila! Now our new roomie could have a little escapism from his dungeon.

IMG_5536.JPG

Yet after Chad moved his things in, including a bed, some rugs, and lamps… it actually looks quite cozy down there! Less dungeon and more den.

Here’s what I’d like to do to the “room” eventually:

  • Hang actual drywall and paint it
  • Enclose the ducts leading into the living room
  • Spraypaint the ceiling white
  • Build a better mantelpiece
  • Disguise the main ceiling duct as a wooden beam
  • Give the door an actual doorknob
  • Put down some giant rugs
  • Place a plant or two in the egress window, which actually gets pretty good light, since it faces South

Of course, the ultimate goal is to finish the entire basement, including by adding a second bathroom. But all that will need to wait until after the holidays. In the meantime, Chad has his space, and Strider is thrilled to have his best buddy living with us!

Winterizing the Garden

Standard

It’s that time of year again: when my garden freezes and looks miserable and all my gorgeous summertime plants turn to pitiful, shriveled corpses. Heckin’ tragic.

I can’t do much to add green, growing things back into my life. So I have to replace them with non-growing, non-green things to give our home less of that haunted-and-abandoned look and more of an intentional aesthetic.

So here’s what has replaced my windowbox petunias:

IMG_5488.JPG

I added the candles and baby pumpkins this year because I had them, and why not? I’ll place battery-powered votive candles on top of them around Christmastime. Because we are New Englanders, and the candle in the window thing is a tradition we’d like to keep! But we haven’t seen it hardly at all out here.

I’ve cut down the corn stalks that looked so cool and creepy around Halloween. They were starting to disintegrate and spread corn leaves everywhere, so they had to go.

As to the garden beds, I’ve added fresh compost and turned the soil in most of them. The kale is still going strong, so it’ll stay untouched as long as it’s getting its winter-vegetable-growth on.

The roses I’m honestly a bit worried about. They had a whole spring and summer to establish their roots, but they’re still vulnerable to frost above ground. I insulated them with some shredded mulch after my father-in-law and I repaired their brick garden beds, which should help. Fingers crossed, rose fans!

Last but not least, I’ve unhooked the rain barrels and am slowly emptying them into the house plants. All that water freezing, thawing, and refreezing isn’t good for the barrels and their spouts, so ideally they should be emptied for the winter.

Gardening has become one of those things I love best in life, and I’m sad to go half the year without anything growing in the ground. This is just encouraging me to find more ways to garden indoors!

I’ve heard that citrus fruit trees grow really nicely in large pots, and they can be transferred between the yard and the house every spring and fall. The trick will be convincing Mr. Fickbonne to help me move a giant potted tree in and out of the house twice a year.

We have plenty of space in our basement for growing dark-loving plants like mushrooms. And who doesn’t love mushrooms (hush, Catey)? So maybe I’ll try an experimental mushroom crop FOR SCIENCE.

And as far as houseplants go, the only thing holding me back is space. Not that the house is too small, but I need to start getting creative with building new shelves and hanging said plants, as they don’t have many surfaces to go on. As God is my witness, I’ll be living in a jungle by spring!

Bricklayers Local 49 Supervised by Tyrant

Standard

We have few rules here at Casa Fickbonne. Maple syrup must be imported from New England. Life is too short to drink bad beer. And when dads visit, they’re deputized into the home improvement brigade.

Mr. Fickbonne’s dad visited this week for the annual elk hunt. And lest he get bored after hiking through hill and dell in pursuit of charismatic megafauna, this weekend I put him to work!

Our front garden beds, where I planted the rose bushes this year, are built of brick. And the corner of one of the beds has been crumbling apart since before we moved in. It’s always been on my list to fix it, but you know how these things go: “I’ll get around to it.” But the temperatures have fluctuated so wildly the last few weeks (snow one day, 60 degrees and sunny two days later, Colorado is ridiculous) that the bricks in the corner finally crumbled into rubble.

IMG_4973.JPG

So with father-in-law in tow, I headed to the hardware store to get some mortar!

Some of the bricks were broken, or so covered in old mortar that we replaced them with fresh bricks harvested from the Garage of Wonder. We had to make sure they matched, but there were apparently enough leftover from the original job that we were able to find several replacements.

IMG_4978.JPG

Using an old flathead screwdriver and a hammer, we removed the old mortar from the parts of the wall left intact. We would’ve used a chisel, but my chisel is so sharp that it was almost too much for the job.

We also had to dig the soil in the garden bed away from the bricks and then, using brillo pads we wiped as much dust off of the bricks as possible. If there’s dirt between the mortar and the bricks, it won’t stick.

Meanwhile, we hardworking bricklayers were supervised from the porch by a vicious tyrant. He was very vocal in his criticisms and impatient with the speed of our work. I’ve never worked under more difficult conditions.

IMG_4975(1).JPG

Here’s the thing about mortar… it’s basically an extreme exfoliant. This was my first time working with mortar, and I learned much too late that I don’t want it on my skin. It removed all my callouses, my fingerprints, and several layers of skin to the point that I had to keep moisturizing my hands with lotion every hour the night after we completed the work. 0/5 stars, do not recommend.

On the bright side, our newfound lack of fingerprints means we can finally start our father-in-law/daughter-in-law bank-robbing crime spree!

IMG_5503.JPG

After rebuilding the crumbled corner, we saw that the top stones along both brick garden beds had never been mortared down. We had some extra* mortar, so we took care of that oversight right quick!

We took a wet rag to wipe off any extra mortar or concrete dust that escaped our experienced bricklayer fingers. And then, behold! Another successful job by Bricklayers Local 49!

IMG_5507.JPG

IMG_5508.JPG

The mortar will get lighter once it fully dries. But I’m already much happier with my structurally sound brick garden beds. And for a couple of amateurs, it doesn’t look too bad! Almost like we know what we were doing!

Once all was said and done, we laid down some shredded cedar mulch to keep the roses insulated for the winter. They look a little pitiful right now, but I’m hoping the mulch will help them get through the cold months. And not a minute too soon: we’re expecting snow tomorrow.

IMG_5510.JPG

Many thanks to my visiting father-in-law for taking time out of his vacation to help me finally get this project done!

*Note: we did not start out with enough mortar and had to go back to the hardware store halfway through the project. Because you’re not really* improving your home unless you make at least two (2) trips to the hardware store.

**You’re also not really doing a good job unless you bleed on a project. Fear not: Jon did the honors by cutting his thumb while chiseling away old mortar.

Something Simple for the Bathroom

Standard

Dedicated readers of Casa Fickbonne (all FIVE of you these days!!!) will recall that the bathroom is probably the most “finished” room in the house. Thanks to the combined efforts of Mr. Fickbonne, yours truly, and our buddy Craig, it’s both functional and stylish. Check it out here!

But our bathroom was missing something. So instead of making progress on one of the many other rooms in the house, or even the yard or garage, I took some time to add a little something.

When we bought our 100-year-old manse, it didn’t have hardly any fixtures in the bathroom. We solved the lack of a toilet paper holder with creativity and flair. But there was really no towel bar for a hand towel by the sink. Instead you kind of had to awkwardly turn around to the set of shelves where we’d haphazardly placed a towel, dripping on the floor the whole way.

Easily fixed with the addition of Mrs. Fickbonne’s Hanging Shelf!

How I Did It

  • I grabbed two small boards of the same length from the infinite pile of scrap wood in the garage.
  • I connected them at a right angle using the kreg jig, a technique I perfected on the Symbolic Table of Generational Bonding and Finn’s First Bookshelf.
  • Then I sanded it. All of this took maybe 20 minutes of my life. Worth it.

IMG_5483.JPG

  • Next I painted it Behr Frost to match the trim and wainscoting in the bathroom.
  • I sealed it with the same water-based sealant I used on Finns’ First Bookshelf.
  • At this point I’d used ONLY material left over from other projects. Budget so far: $0. But I wanted to jazz it up a bit, so instead of hammering in nails or some other basic hook, I ordered me some fancy knobs off of Wayfair. They matched the jade accent color we’ve used throughout the bathroom. Très chic! But this added about $17 to the project.

IMG_5485.JPG

  • Then I got lazy. My shelf was built, my knobs were installed, and I hadn’t bothered coming up with a creative solution for mounting the thing on the wall. Spoiler alert: this is always where my plans fall apart. So I just screwed the damn thing into the wall after centering it above the toilet. I probably should’ve used anchors, but I STAND BY MY DECISION.

And voila! A shelf! A place to hang towels and hold plants and candles and stuff!

IMG_5486.JPG

IMG_5487.JPG

The more I learn about woodworking, the more I realize how easy it can be. It’s relaxing, satisfying, and fun to make something for myself. And it’s just more affordable! A quick search revealed similar shelves running anywhere from $30-$75 on Wayfair, and something comparable at Target is $30.